 |
Cosmic Ray Muon Detectors |
|
Somewhere out there is a list of "10 Things a Physics Teacher is Least Likely to Say." If one were to find this list, it would have on it such gems as #7. Let's challenge the PE Dept to a game of rugby and #4. I don't care if you understand the concept, just give me the correct answer to 12 sig figs.
Finally, you'd get down to the biggie, the thing physics teachers never say:
#1. Let's do a particle physics lab right here at Podunk Corners High!The traditional reasons for this are that everyone knows that particle physics is only done with Vastly Expensive and Complicated Equipment run by casts of thousands of Highly Qualified Scientists and that particle physics is Difficult and Arcane.
Yet that perception is changing . . . and the list may need updating. After all, the technical complexity of the space shuttle doesn't stop us from building all kinds of model rockets. And with particle physics, we can go one better. After all, a model rocket can't reach outer space. Yet we can build real instruments which actually detect and can even make measurements of actual elementary particles. Those particles are cosmic ray muons . . . and detecting them is not as hard as you think.
Your mission, should you decide to accept it, is to plan a workshop activity for physics teachers in which theycosmic ray detectors. But how . . . ? construct, commission, operate, and experiment with
Step 1: Construction
To construct a cosmic ray detector, first you need a design. We have several designs from which to choose. Each has strengths and weaknesses and each is better suited for some kinds of experiments than the others. Below is a rundown of the main detector types we are aware of, what they can be used for, their relative advantages, and where they were developed. From there you'll find a "LEARN MORE" link which goes to a more complete report on each detector and how to construct it.
The Berkeley DetectorAdvantages: Portability, reliability, ease of use Developed at: Lawrence Berkeley National Laboratory
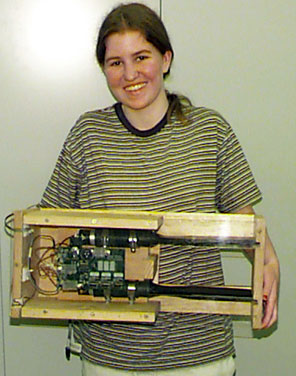 LEARN MORE |
The Fermilab DetectorAdvantages: Versatility, can use surplus parts Developed at: Fermi National Accelerator Laboratory 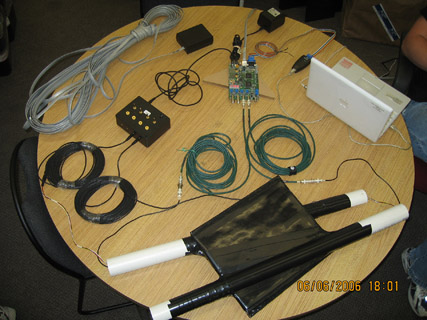 LEARN MORE |
The Penn DetectorAdvantages: Low cost, instructive design Developed at: University of Pennsylvania
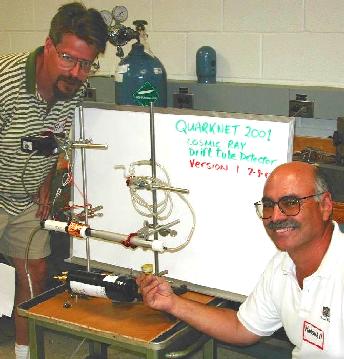 LEARN MORE |
Commercial Geiger DetectorAdvantages: Low cost, portability Developed at: Aware Electronics 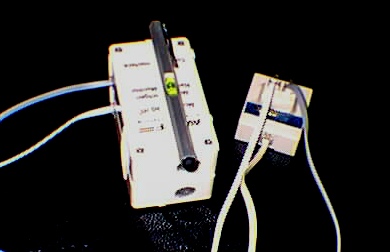 LEARN MORE |
Step 2: Commissioning
Commissioning is the important last step before a detector begins operation. To commission a detector, physicists make sure everything works as it ought to and calibrate it so that the data generated is comparable with that from other detectors worldwide. There are several cosmic ray detectors that you might work with and each has its own specifications and uses. Nevertheless, most cosmic ray detectors have certain traits in common which you ought to check.
The following items are important to good detector operation:
Good Connections: Make sure you've made all required electrical connections with good contact. If there is doubt about some of your connections, check for continuity with a multimeter.
Power: Make sure your power supply is running at the correct voltage.
All Systems Go: Is everything "on" that is supposed to be?
Configuration: See to it that everything is in place. For example, for a coincidence detector, one counter should be on top of the other. (The coincidence configuration eliminates electronic noise generated by each counter operating separately.)
Integrity: Nothing should be getting in or out that oughtn't. An important example, for scintillating detectors, is light-tightness. The paddles and PMTs should get zero ambient light: the only light inside the scintillator should come from scintillations due to charged particles. If one or more counters is reading rapid counts off the scale, it is probably not light-tight and needs to be recovered.
Counts Real Particles: If you can get a known radiation source (example: a thorium lamp mantle), bring it in the vicinity of your operating detector to see if it gives an increase in counts. Vary the distance of the source from the detector: does the count fall off as 1/r2?
Background: You want to see cosmic ray muons, not background radiation. Find a way to check background. One way, with a coincidence detector, is to separate the counters, putting them a few feet apart horizontally. Occasionally, two different particles will be picked up by the detector—one to each paddle—and be counted as a coincidence if they are close together in time. These are called "accidentals." The rate of accidentals should be subtracted from your count rate.
Comparison with a Standard: Find out how your detector compares with another of similar characterics. Compare your cosmic ray flux with published values. To get an idea of how many counts your detector should get per unit time, consult the Particle Data Book or the SLAC Cosmic Ray page.
Compare Uncertainties with Statistical Expectations: Let's say you take a count for a time interval and get 205 counts. You repeat the experiment and get 198 counts. Is this within the range of expected error? Well, a rough estimate of statistical uncertainty is the square root of the number of counts: so if you get 205 the first time, 2051/2 = 14.3, so our second count of 198 is well within this expected uncertainty.
Accidentals can be a problem.
Step 3: Operation
So you have your detector. It works, and it is commissioned. Turn it on!
The first thing you'll see, either on an LED display or a computer screen (or both) is numbers registering. You are counting particles passing through your detector—some of which are cosmic ray muons. If you have a two-paddle counter, you can set your electronics to record only coincident signals. You've filtered out noise. The remaining counts are mostly muons!
If you leave this device running in the classroom, it will no doubt arouse the curiosity of some of your students. It is the perfect "teachable moment" for them to find out about the swarms of charged particles which pass through them every day.
The next step is to collect data with your colleagues or with your students. There are specific recommendations for experiments below, but the first thing you should do is "play"with your detector. Try to find out what causes the muon count to go up or down and by how much. Get used to taking data and running the equipment.
Step 4: Experimentation
You have a working cosmic ray detector—or group of them. It's time to do some physics!
You will find four suggestions below. These are not, however, step-by-step instructions (except in the most rudimentary form). They are intended, rather, to be sources of ideas with references for further study and planning. You will find the ideas are not mutually exclusive, and you might be able to devise different experiments as well as new combinations of these four.
Good luck and good muon hunting!

The Lifetime of the MuonEquipment Needed: Single or double-paddle detector with thick scintillator and fast electronics. Method in Brief:
|
Muon Flux ExperimentsEquipment Needed: Counting detector, portable if possible. Method in Brief:
|
Measurement of g-2Equipment Needed: One or two paddle detector with fast electronics, a large electromagnet Method in Brief:
|
Cosmic Ray Air ShowersEquipment Needed: Counting detector, GPS, computer with Internet connection Method in Brief:
|